![]() Tutorial: Creating Opportunity
Tutorial: Creating Opportunity
Opportunity
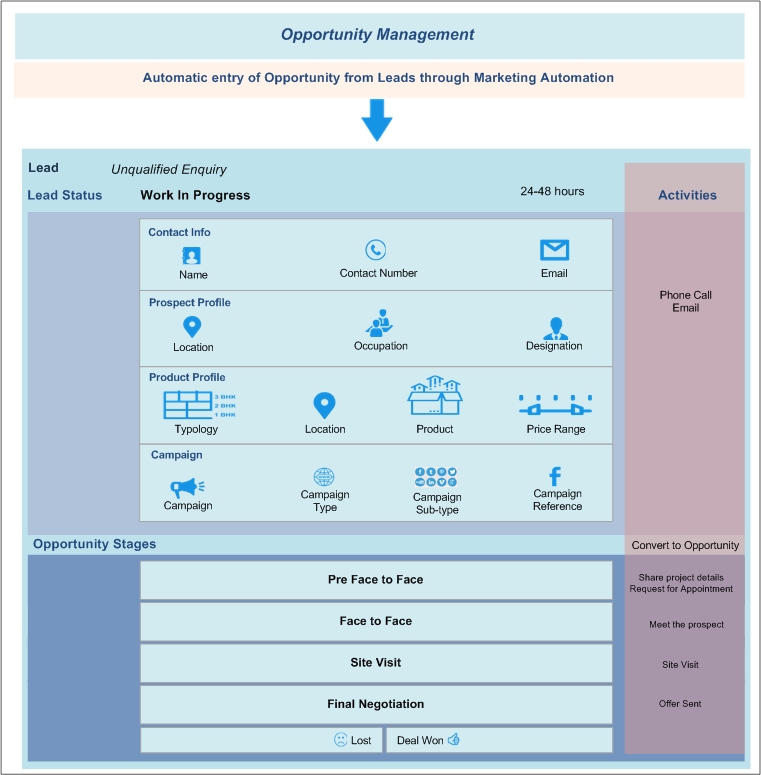
Before creating opportunities, user needs to record the following informations like
Creating Opportunity
Opportunity interface allows sales team to close customer dealing faster by sharing consistent sales information, tracking deal progress, and recording deal-related interactions.
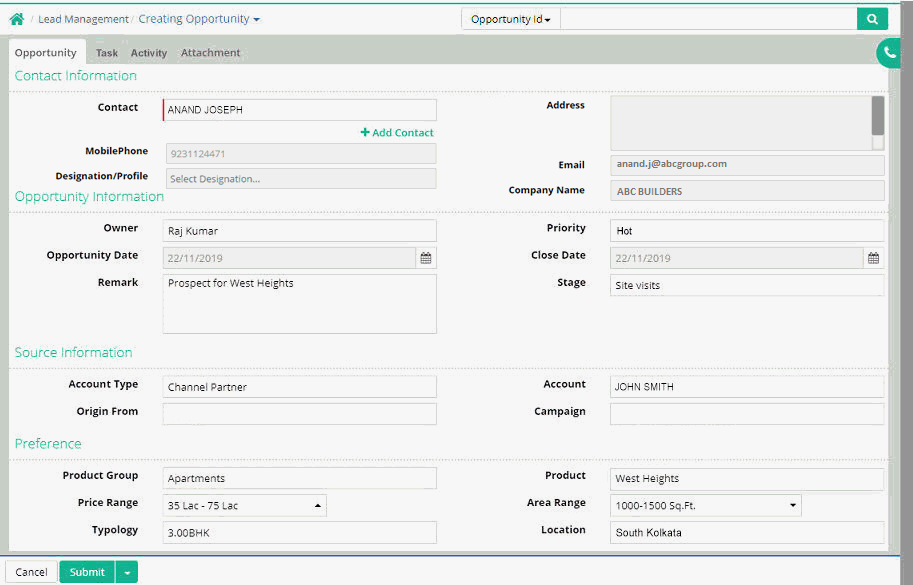
Contact Information
Contact: Select the existing contact. (Record comes from Lead Management > Contact)
Address: Address entered in the contact page will be displayed here.
Mobile Phone: Address entered in the contact page will be displayed here.
Email: Email Id entered in the contact page will be displayed here.
Designation/Profile: Designation or profile can be selected.
Company Name: Company name entered in the contact page will be displayed here.
New contact can also be created through '+ Add Contact' link
Opportunity Information
Owner: This owner name will automatically appear on the text-box as owner is mapped with Sales Person & specific login user.(Record comes from Setup > Sales Team > Sales Person)
Priority: Select the priority from Warm, Hot, Cold, Not Interested
Opportunity Date: Enter the opportunity date
Close Date: Enter close date
Stage: Select stage of opportunity from drop down list. (Record comes from Setup > Qualification Categorization > Opportunity Stage)
Remark: Enter remark in this field
Source Information
Account Type: Select the type of the account. (Record comes from Setup > Transaction Types > Account Type)
Account: Search and select the account name. (Record comes from Lead Management > Account)
Origin From: Select the origin of opportunity such as Telephonic, Walk In, Email etc. from drop down list. (Record comes from Setup > Transaction Types > Origin Type)
Campaign: Choose campaign. (Record comes from Lead Management > Campaign)
Preference
Product Group: Select the product group. Product group includes commercial, retail/showroom, residential etc. (Record comes from Setup > Product > Product Group)
Product: Select the name of the product. (Record comes from Setup > Product > Product)
Price Range: Set the price range. (Record comes from Setup > Prospect Profile > Price Range)

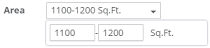
Area Range: Set the area range in square feet
Typology: Select the typology for e.g. 1BHK, 2BHK, 3BHK and so on. (Record comes from Setup > Prospect Profile > Typology)
Location: Enter the location. (Record comes from Setup > Prospect Profile > Location)
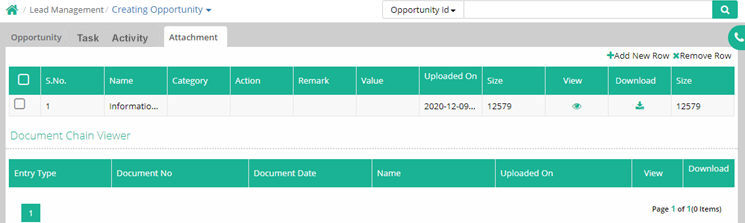
For any file attachment with opportunity data use Attachment tab and then use “Add New Row” Button.
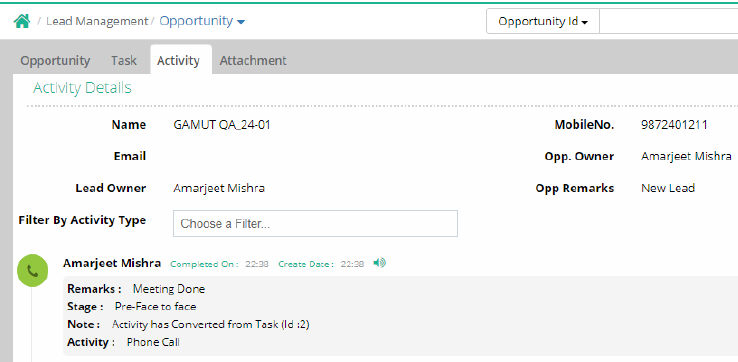
Task Id is showing in Activity History page when Task is converted into Activity.
Opportunity Status
After creation of opportunity, the new opportunity is displayed in the opportunity status form as marked below
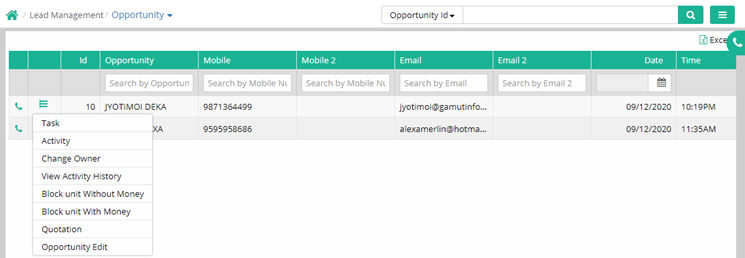
Above mentioned options are available to perform from any particular opportunity menu.
Stages of the opportunity
There are three different colored areas to indicate the stages of the opportunity. Blue colored areas imply achieved stage, green color implies the current stage and light gray colored areas imply future stage of the opportunity.
This depends on the opportunity stages covered in time of activity progress.
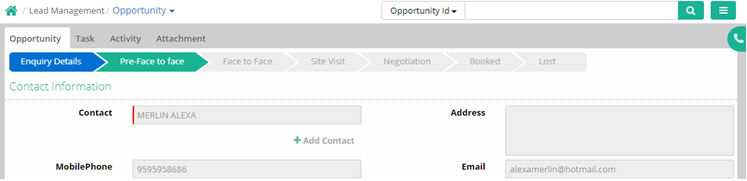
Different stages of status are as follows
Enquiry Details
Pre-face to face
Booked
Lost
Advance Search:
An Opportunity created can also be searched through advance search.

Account with account mobile number can also be viewed as shown below
Example
| Opportunity Stage | Opportunity Sub Stage |
| Pre-face to face | |
| Face to face | |
| Site Visit | |
| Negotiation | |
| Booked | |
| Lost | Budget not matching |
| Product not matching | |
| Not ready/ Under construction | |
| Dimension not matching | |
| Location not matching | |
| Booked with competitor | |
| Availability issue | |
| Postponed purchase | |
| Note: User can create sub-stages for lost |
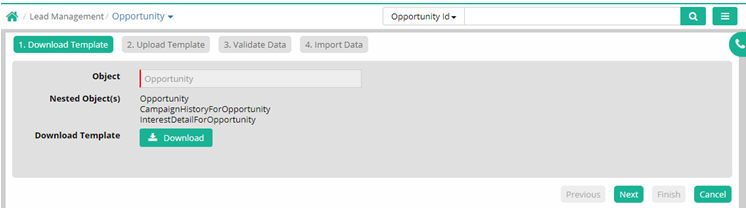
Opportunity Import
Lead can be imported using a proper lead import template. In this process users have to download the lead template from the given import menu. Then this template has to be filled with proper information. Then upload this template and validate for any error. If it shows success after validation then import this template data in the system using the import button.
| ImportLinkRefCode | Product Group | Product Name | Minimum Area | Maximum Area | Budget From | Budget To | Typology |
| OP001 | Residential | Garden Green | 1200 |
1500 |
5000000 |
6000000 |
2 BHK |
| OP002 | Residential | West Stretch | 1400 |
1600 |
7000000 |
9000000 |
3 BHK |
| OP003 | LUXURY APARTMENTS | Southern Gate | 1800 |
2100 |
9000000 |
12000000 |
4 BHK |
| OP004 | Residential | Mangrove | 1200 |
1500 |
5000000 |
6000000 |
2 BHK |
| OP005 | Residential | Rubix Heights | 1400 |
1600 |
7000000 |
9000000 |
3 BHK |
| OP006 | LUXURY APARTMENTS | Armada | 1800 |
2100 |
9000000 |
12000000 |
4 BHK |
| OP007 | Residential | Lotus Towers | 1200 |
1500 |
5000000 |
6000000 |
2 BHK |
| OP008 | Residential | West Stretch | 1400 |
1600 |
7000000 |
9000000 |
3 BHK |
| OP009 | LUXURY APARTMENTS | Southern Gate | 1800 |
2100 |
9000000 |
12000000 |
4 BHK |
| OP010 | Residential | Rubix Heights | 1200 |
1500 |
5000000 |
6000000 |
2 BHK |
| OP011 | Residential | Mangrove | 1400 |
1600 |
7000000 |
9000000 |
3 BHK |
| OP012 | LUXURY APARTMENTS | Armada | 1800 |
2100 |
9000000 |
12000000 |
4 BHK |
| OP013 | Residential | Rubix Heights | 1200 |
1500 |
5000000 |
6000000 |
2 BHK |
| OP014 | Residential | Mangrove | 1400 |
1600 |
7000000 |
9000000 |
3 BHK |
| OP015 | LUXURY APARTMENTS | Southern Gate | 1800 |
2100 |
9000000 |
12000000 |
4 BHK |
Note: Call recording features added in Opportunity
![]() Tutorial: Creating Opportunity
Tutorial: Creating Opportunity
© Gamut Infosystems Limited