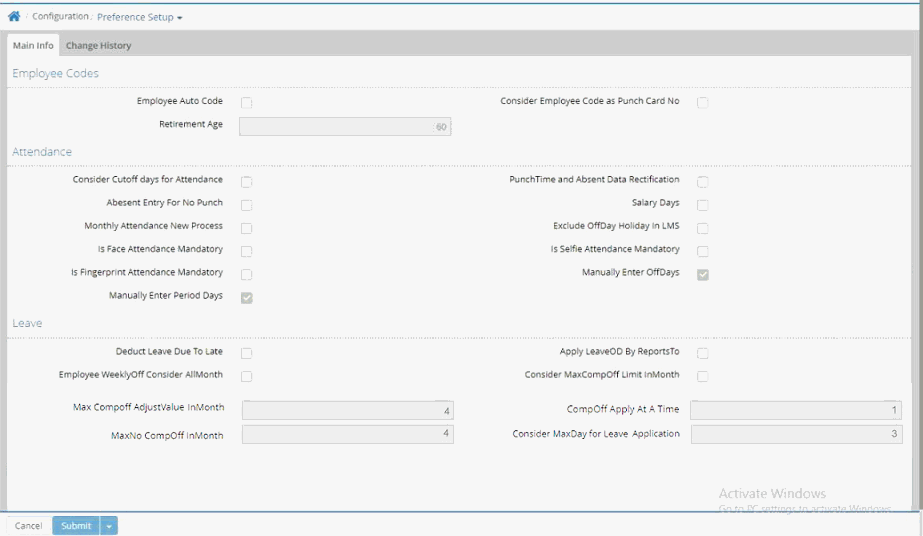
Preference Setup
Payroll preferences are important tools that help user enable and modify various payroll features based on the requirements and decisions made by the organization. HR Head controls this setup after decision made by the management.

Employee Code Auto: This option is selected to activate employee code creation through Payroll > Setup Menu > Employee Setup > Employee Code Auto. Employee Code Auto setup is done to maintain a sequence in the employee code while creating Employee Master. User is not required to enter employee code manually. It will be generated automatically.
Retirement Age: Retirement age is required to be entered. It is illustrated in the following example.
Retirement Age |
Illustration |
60 |
After 60 years employee will automatically be retired. In organization master, status will be changed from working to retired; effect will go for family pension fund calculation. (In general 60 years will be the retirement age in every organisation) |
80 for example |
If an employee works more than 60 years in special case if organization demands, then it should be entered in preference setup |
Confirmation Period (in
Month): Organization can set employee confirmation period in months.
It is illustrated in the following example.
Confirmation Period (in Month) |
Illustration |
6 |
After six months a newly joined employee is confirmed and made permanent in job based on his/her performance and organization’s decision. After confirmation, incremental leave will be enabled.(In general 6 months will be the confirmation period in every organisation) |
Minimum Age: Minimum age
of entry is entered here decided by the organization. It is illustrated
in the following example.
Minimum Age |
Illustration |
18 |
Minimum age for applying and entry for the job is 18. |
21 |
Minimum age for applying and entry for the job is 21. |
Proportionate PF Statutory Limit on LWP Days: Pf will be calculated
(In case of statutory limit is activated in Payroll
> Setup > Localisation > Statutory Setup) on the changed basic salary amount
due to absent days. It is illustrated in the following example.
Basic Salary |
Month Days(April) |
PF |
20000 |
30 |
1800 |
18667(20000/30*28) |
28 (2 days absent) |
1800 |
14667(20000/30*22) |
22 (8 days absent) |
1760 |
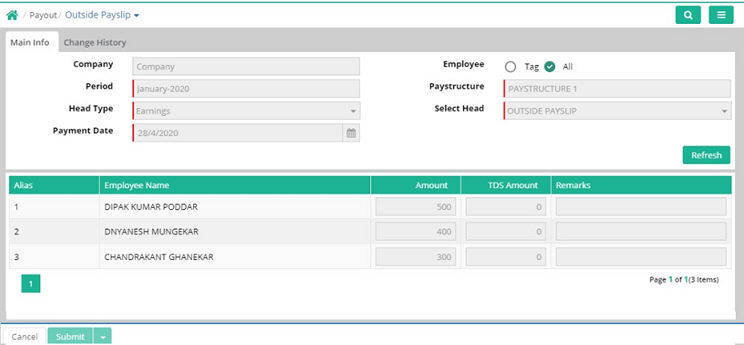
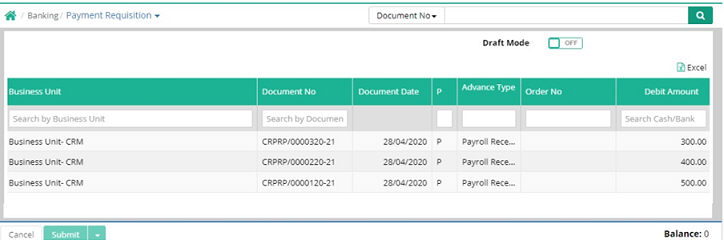
Payment Requisition: If this option is activated then after payment
from Outside
Payslip whether it is Earning or Deduction (Payroll
> Payout > Outside Payslip)
and Advance
(Payroll
> Advance > Advance)
then user will be able to find the amount using the ledger name which
are tagged in posting head category in payroll (entry made in payroll)
in Payment
Requisition interface (Financials
> Banking > Payment Requisition).
It is illustrated in the following example.
Outside Payslip Entry in Payroll
Outside payslip entry is required for the payment which is apart from salary
Payment Requisition in Finance
Employee Payslip Show activated: If it is activated employee will be able to see the payslip through Employee Portal. This is configured through Payroll > Setup Menu > Configuration > Payslip Show and employee can view own payslip from Employee Portal > My Finance > Payslip Show
Deduct Leave Due to Late: This is activated the functionality to deduct leave or absent of employee due to late(for example 3 late coming will deduct one leave from closing balance as per condition set) and it can be set through Payroll > Setup Menu > Configuration > Leave Setup > Leave Master

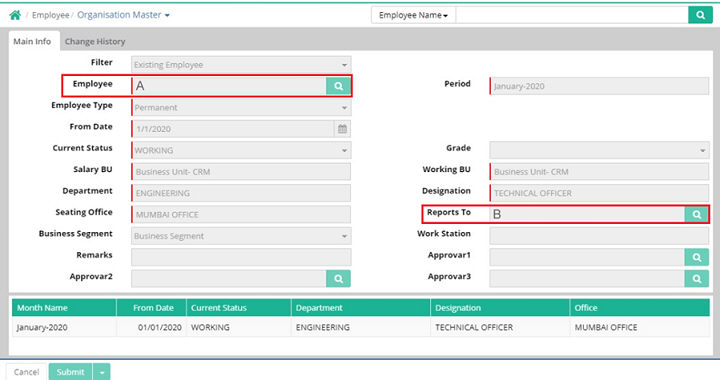
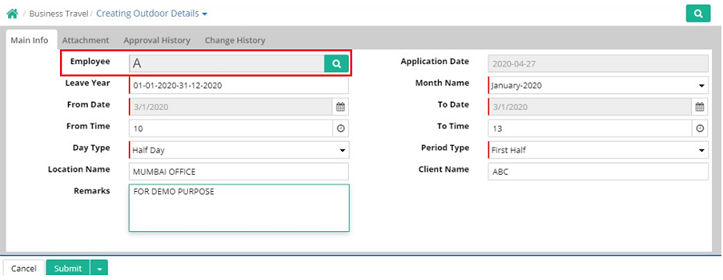
Apply Leave OD By Reports To: If this is selected then reporting manager or reports to can be able to apply leave (Employee Portal > My Portal > Leave) and outdoor entry (Employee Portal > My Portal > Outdoor Entry) on behalf of his/her sub-ordinate employee(s). It is illustrated in the following example.
Employee ‘A’ reports to Employee ‘B’, (configured through Payroll > Employee > Organization Master). Now Employee ‘B’ can apply leave and outdoor entry on behalf of employee ‘A’.
Employee |
Reports To |
Leave and Outdoor Entry |
A |
B |
‘B’ can apply on behalf of ‘A’ |
C |
D |
‘D’ can apply on behalf of ‘C’ |
Setting up Employee ‘Reports To’ in Organization Master
Outdoor Details Entry
Consider Cutoff Days for Attendance: If it is activated then number of days in monthly attendance will be as per calendar days. If not activated but organization maintains cutoff days in monthly attendance then it will calculate number of days in month as per cutoff days set. For example:
Cutoff days |
Month of November days in monthly attendance (If cutoff days are not considered) |
Month of November days in monthly attendance (If cutoff days are considered) |
26th to 25th of the month |
26th October to 25th November = 31 days |
30 days |
Bulk Salary Process Limit: In preference setup bulk salary process limit can be defined. This can be used by Organization where employee strength is higher.
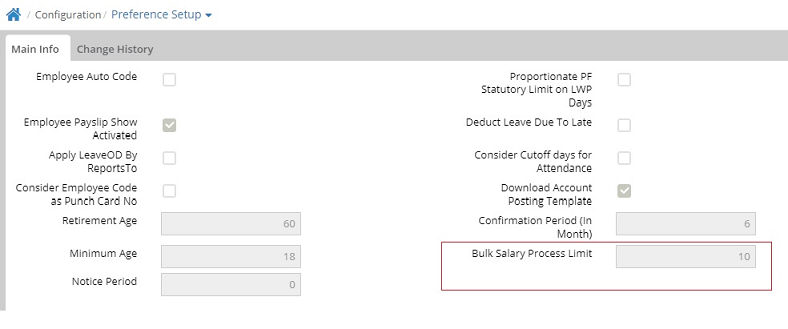
1. For Employee Strength 1000 and above - organization can give 100 in bulk process limit, so the batch processing of 100 will be generated in queue.
For Employee strength around 100 – organization can give 10 in bulk process limit, so the batch processing of 10 will be generated in queue.
2. If no value is given in Bulk salary processing limit then payslip will be generated as per available employee strength for the processing
Impact:
1. Payslip will start generating in queue as soon as limit is defined in preference setup and while generating salary it will give the message “Salary auto process already start in Background. Please check queue info tab for details”
2. Limit is set at the enterprise level, but it will work as company wise payslip generation
3. Multi Company i.e. one or more company salary payslip can be generated in queue at the same time
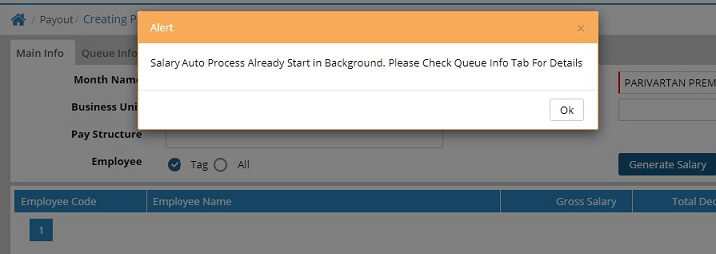
Queue Info:
1. Total Count – It will show the number of total count in the company which is available for payslip generation
2. Processed Employee – It will show number of employees whose payslip generated
3. Pending – It will show the remaining employees whose salary generation is pending
4. Refresh Button – On clicking this button it will show the current status
5. Show Details – On clicking this button it will show the “Payslip not generated for the employees” in the grid below
6. Clear Queue – On clicking this button, one can clear the queue count for that company
© Gamut Infosystems Limited