![]() Tutorial:
Creating Leave Master
Tutorial:
Creating Leave Master
This interface is used to enter the details about leave related information and also the details about the periodic leave increment of the employees. For example, Privilege Leave, period wise increment, casual leave, sick leave etc.
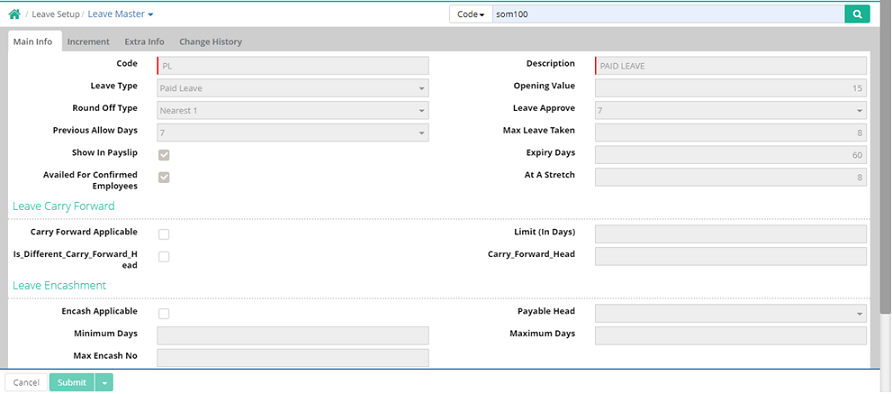
Main Info
Code: It is short coded name for the leave type that is used here which can either be alphabetical or alphanumeric one. An abbreviated code for the leave type is to be entered here.
For example, for this interface the code used can be PL, P, PL1, PL01, etc. (Note: If the specific code is searched, description will be auto populated and vice versa). However, the restricted limit for the code is 60 (sixty) characters. The code has to be entered in between this restricted limit, which can not exceed.
Description: An explanation for the name of the leave type will be entered here. Description can be different according to the convenience. When the code is entered, description will be auto generated and vice versa (Mandatory). For example, ‘Privilege Leave’ for the code ‘PL’.
Leave type: The type of leave applicable has to be selected from the pre defined drop down list. For example, ‘Normal’ has been selected here.
Opening Value: The number of starting privilege leave applicable has to be entered here. For example, number of 10 privilege leave is applicable. The opening value is limited to the number of leave applicable by the organization.
Round off type: The round off digit has to be selected from the pre defined drop down list here. For example, ‘Nearest 1’ has been selected here.
Leave approved: The number of leave to be approved has to be selected from the drop down list. Here 1 approve leave has been selected.
Previous allow days: The number of previously allowed privilege leave days has to be entered here. For example, 1 has been selected from the drop down list.
Max leave taken: The number of maximum leave taken has to be entered here. For example, ‘2’. It can be any as per applicability.
Show in payslip: This check box has to be selected if, the details are needed to be displayed in the payslip.
Expiry Days: In leave master there is one box where user can set the limit of number of days which signifies that if an employee does not avail the leave balance within that period then it will get lapsed.
For example- If 60 days is the limit then the employee needs to avail the closing balance within 60 days.
[Note:- This is non mandatory field and can be used as per policy]
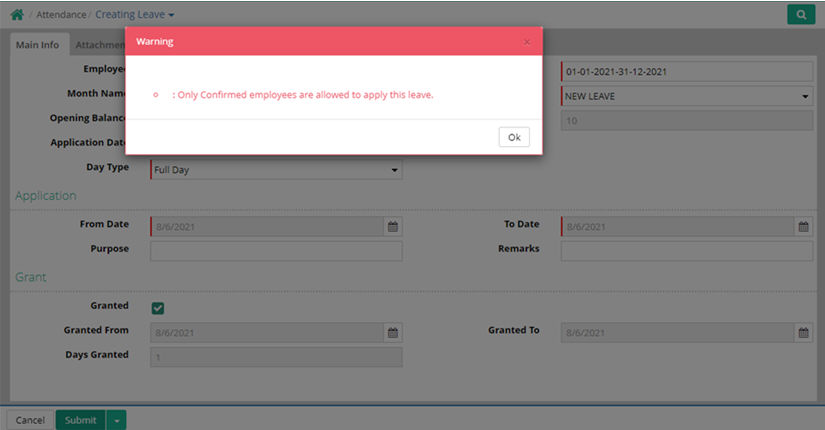
Availed for Confirmed Employee: If this is selected then the following warning message will be shown at the time of leave application by unconfirmed employees for the selected leave head.
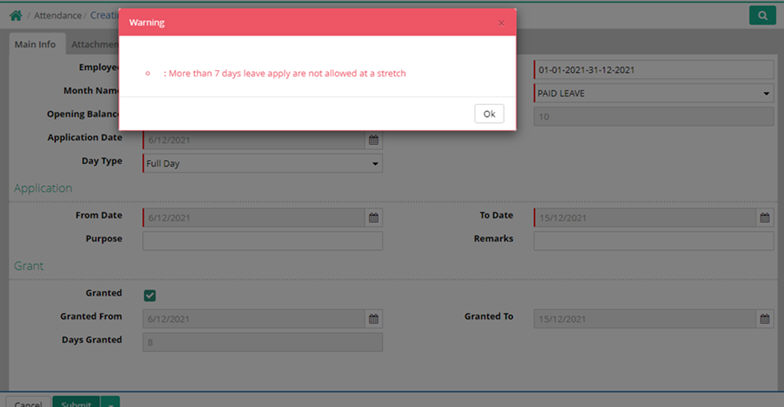
At A Stretch: An employee will not be able to take leaves against a particular head at a stretch according to the limit set in leave master.
That
employee can take leaves with multiple applications.
Leave carry forward
Carry forward applicable: This check box is to be selected, if the leave type can be carried forward.
Limit (in days): The restricted limit applicable for the number leave that can be taken has to be entered here. For example, ‘10 days’, it can be any as per convenience.
Leave encashment:
Encash applicable: This check box is needed to be selected, to ensure the encashment of leave types.
This field is required to be entered only encash applicable check box is selected.
Minimum days: The lowest number of leave encashment has to be entered here. For example, 1 day of leave.
Maximum days: The highest number of days for the leave encashment applicability has to be entered here. For example, 10 days.
Payable Head: The payable head for the leave procedure has to be selected from the pre defined drop down list. For example, ‘LEAVE EN-CASHMENT’ has been selected here.
Max encash no: The highest number of encashment applicable has to be entered here. For example, 10.
Increment
From the same interface, the next option ‘increment’ tab has to be clicked to set period wise leave increment details.

Increment type: The type of increment applicable for the respective leave type has to be entered here. For example, the ‘period wise increment’ has been selected from the drop down list.
Increment duration:The frequency duration applicable for the relevant increment type has to be selected from the drop down list containing option such as ‘Monthly’, ‘quarterly’, ‘yearly’. For example, monthly has been selected here.
Increment days: The number of days applicable for increment has to be entered here. For example, 1.5 days.
For confirmed employees: This check box has to be selected if the increment is applicable only for the confirmed employees.
Consider for attendance: This check box has to be selected if the attendance is needed to be considered for the respective increment type.
Minimum Present days: The lowest number of present days has to be entered here. For example, 15 days has been selected here.
Maximum increment days: Maximum number of days the increment is applicable has to be entered here. For example, 15days.
Calculation basis: The basis for the calculation of increment has to be selected from the drop down list containing option such as ‘ Prorata on present days’, ‘ fixed leave’ and ‘fixed on salary days’.
Increment start month: The date in which the applicable increment will be starting has to be selected from the drop down list.
Maximum monthly balance: The maximum monthly balance applicable has to be entered here. (If required)
Maximum yearly balance: The maximum yearly balance has to be entered here. (If required)
Quarterly Leave Increment
Leave increments can be set to occur every three months. With this enhancement, employees will receive their leave increments at the end of each three-month period.
Path: Payroll > Setup > Leave Setup > Leave Master form
Setting up a Quarterly increment system for Casual Leave.

Go to Increment tab.

In the Increment Duration Quarterly Dropdown has been added.

The calculation for these increments will be based on three methods:
Prorata on Present Day
Fixed Leave Increment
Prorata on Present Plus Leave Days
1.Prorata on Present Day means that the casual
leave entitlement is calculated proportionally based on the number of
days an employee has worked in a quarter.
Example:
If an employee's quarterly leave increment is 3 days and they work the
entire 3 months without taking any leave, they will receive the full 3
days of casual leave. However, if the employee takes one day leave/absent
their leave increment will be reduced based on prorata.
Calculation Logic:

1) 2.Fixed
Leave Increment means that regardless
of whether the employee has taken any leave/Absent or not, a fixed number
of leave days will be added to their balance.
Example: Even if an employee takes 2 leave days in a quarter, they will still receive the full 3 days of leave in the quarterly leave increment.
3.Leave Increment Pro-rata on Present Plus Leave Days means that the leave increment is calculated based on the number of days an employee is present, plus any leave days they have taken. This ensures that employees receive a fair amount of leave based on their actual working days and the leave they have utilized.
Example: If
an employee worked for 60 days and taken 2 leave days, then leave increment
would be calculated based on these 60+2 = 62 days.
Calculation Logic:


Note: The
increment days can vary based on certain aspects, such as
mid-month joining and mid-month
resignation, for the 1 and
3 setup mentioned above.
· The Leave Increment Start Month on a Quarterly Basis refers to the specific months when leave increments are calculated and added to an employee's leave balance.
Example: An employee who joins the company in January will have their leave increment set to occur in May, with the actual increment being credited in June(for January to December Leave year).
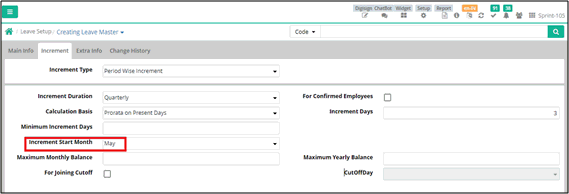
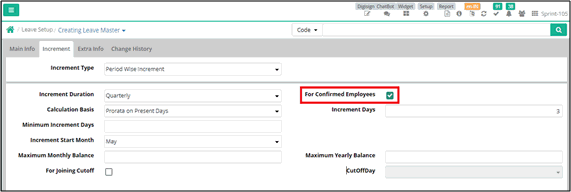
· If we select the checkbox For Confirmed Employees, the leave increment will apply exclusively to those confirmed employees.
Extra info
To move on to the next option, Extra info tab has to be selected.

Negative leave: This check has to be selected, if the negative leave are applicable inside the privilege leave.
Consider holiday offday: This check box has to be selected if, holiday or offday is considered under the privilege leave.
Negative leave limit: The restricted number of negative leave applicable has to be entered here. For example ‘5’ negative leave is applicable. It can be any as per convenience.
Consider absent: This check box has to be selected if, number of days absent is also considered under this leave.
Leave without pay: This check box has to be selected if the leave is applicable without any payment. (if required)
Document attachment: This check box has to be selected if any document has to be attached with the entry.
After entering all the details, the submit button has to be selected to save the entry. Then ok has to be selected to close and complete the entry.
![]() Tutorial:
Creating Leave Master
Tutorial:
Creating Leave Master
© Gamut Infosystems Limited