| Business Rule |
Approval workflows are defined through Business rules for different transactions and masters. If more than one workflow has been defined for the same document, priority will decide which rule will come into effect. Advanced conditions can also be applied to the rule.
Parallel Level Approval System
User can define multiple Approval level(s) as Parallel Level so that any one user of those levels can approve the document as per availability without depending on the previous level full approval (within the Parallel Level group). READ MORE.
Business rule has two main components –
i. a Condition (If clause). Example, If BU is ABC or If amount is
ii. an Action (Then clause) to be executed. Example, then approver is User A, or then approver is User B

Entry Type: Select the transaction or master form for which work flow has to be defined.
Operation: Select the entry mode operation – Save, Edit or Delete on which the workflow will be applied. Example, the approval process will be triggered when a transaction or master is Saved.
Is Active: Select yes to mark a workflow as active or operation. To deactivate a Rule, in the edit mode, select No here.
Active Till: Enter the date up to which date this Rule will be valid or operation
Rule Set sequence: Put as 1 (this is sequence if Rule Checking)
Rule Set Description: Enter a name for the workflow being defined
Rule Type: Select IF THENRULE. We recommend the use of IF THEN RULE
Final approval email required: Tick this checkbox if email(s) have to be sent when the final approval of a document has been done.
Email template: Select the Email Template which is to be used for sending the email. The email template will determine to subject and body text of the email. The emails will be send to relevant users depending on the different actions of the rule.
Please ensure that email id and mobile number for the users have been defined in Login Users so that they can receive email and SMS. Also ensure that Send Email and Send SMS have been activated for the document Entry Type.
Entry Type |
Property |
Operator |
Value |
Remarks |
Indent |
BU ID |
= |
BU ABC |
Define operator, select BU(s) |
MR |
Created By |
= |
User abc |
Define operator, select user (created by) |
PO |
Amount |
> |
1 |
Define operator, enter Amount |
WO |
Prefix |
= |
WO |
Define operator, select TOD |
To Add the Condition(s), add new row through Add New Row button. For every condition a new row has to be added.

Add Group: For the first condition we always need to click on Add Group. Refer to Nested Conditions.
Clause/Condition: There are two options i) AND ii) OR. There are three scenarios in which these can be used.
1. Only one condition – Use And.
2. All conditions have to be true – Use AND for all conditions
3. Any one condition has to be true – Use OR from second condition. For first condition choose AND only.
Entity/Property: Default options are displayed but for some documents all options may not be relevant and only valid options will be displayed. The options are

Reference By: If role based approval has to be activated for Payroll related workflow like leave, attendance, check mark this box.
Operator: There are some logical operators available in building expression of workflow condition. Some of operators like = (equal to) and != (not equal to) can be used for all entities. Other operators should be used where there is a numerical value or amount.
= value is equal to
!= value is not equal to
> value is greater than
< value is smaller than
>= value is greater than equal to
<= value is smaller than equal to
End Group: When all Conditions have been defined, tick the end group for the last condition. In case there is only one condition, it will also need to be ended using. Group end indicates that now the Action associated with Condition can be defined in the next tab.
For more details on nested conditions, refer to Nested Conditions
Click Save to save this condition. To add new condition, add new rows and repeat the above steps.
After reading the various combinations of conditions defined, when the condition has been fulfilled, the business rule action will come into play. Action is defined as described below.
Action
After all necessary Conditions have been added, press on the Next Button and the Action screen will be displayed. In action we define the action associated with Condition defined above. user on level basis
Action |
|||||
Action |
User |
Parameter Value |
Option |
No of Approver(s) |
Remarks |
Level 1 |
User |
User A |
All |
1 |
Only one user will approve document |
Level 1 |
User |
User C, User B |
ANY |
1 |
Any one user will approve document |
Level 1 |
User |
User A |
All |
1 |
Once the user A will approve document then Document will move to second level user B |
Level 2 |
User |
User B |
All |
1 |
|
Level 1 |
User |
User B, User C |
ALL |
2 |
Once both users B and C approve the document will move to level 2 –user D and after approved by level 2 document will move to third level user F |
Level 2 |
User |
User D |
All |
1 |
|
Level 3 |
User |
User F |
All |
1 |
|

Action: Action is the level which define in Approval action
Reference By: If role based approval has to be activated for Payroll related workflow like leave, attendance, check mark this box.
User/Profile: Values for Profile will only be displayed if Reference By has been activated above. Profiles are predefined which are tagged ...
Parameter: Select users who will do the approvals for a given condition. One or more user(s) who can approve the Document for this level.
Option: Two options i) Any, ii) All are provided here.
If all users need to approve the document to move forward for next level or final, select ALL.
If anyone approver (not all) is enough to approve, select ANY.
No of Approver(s): Define the number of users needed to approve the document. In case there is only one approver chosen above, this will always be 1.
In case all users need to approve the document, this number should be equal to the number of
Approvers selected above.
If any option is selected, define the number of users who need to approve. Example, if three Users are selected above, and any two of those users have to approve the document, enter 2 here.
Click Save to save this condition.
Add condition: Inside an action also, extra conditions can be defined by clicking on the button. This will help in avoiding creation of the multiple business rules for each BU. When a new BU is added, only condition may need to be modified.
Use case – a condition is defined at the enterprise level, and action defined for various users, depending on the BU which will be defined as an additional condition here.

Replace User
Replace user feature allows replacing any user who is already tagged in the business rule.
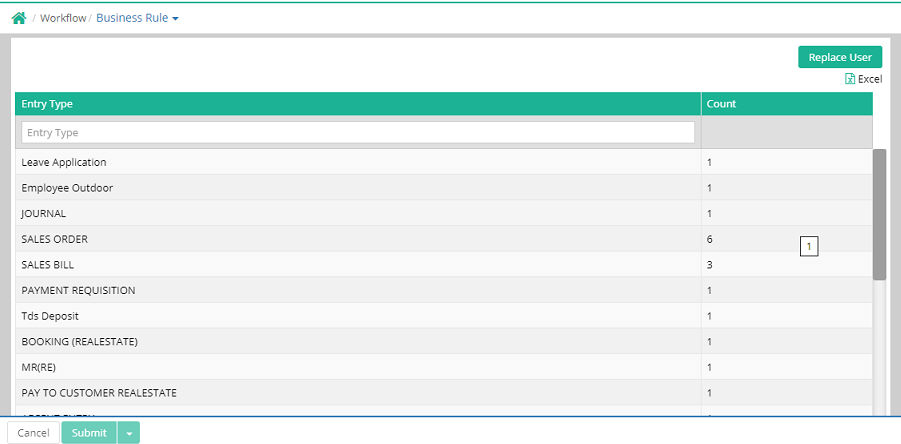
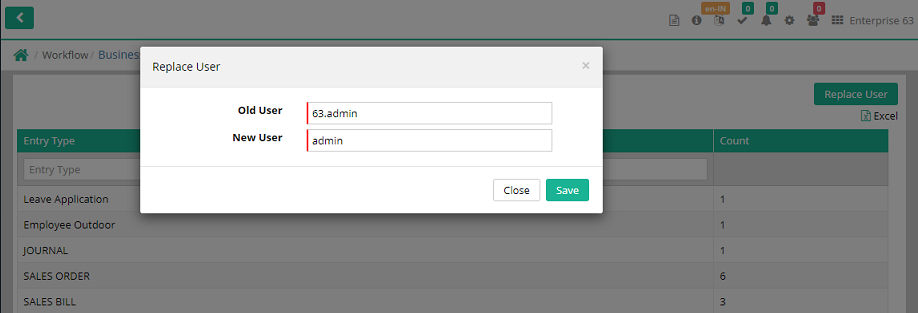
If replaced then the effect will be that all provisional documents where this user is tagged will be automatically be replaced.

Example
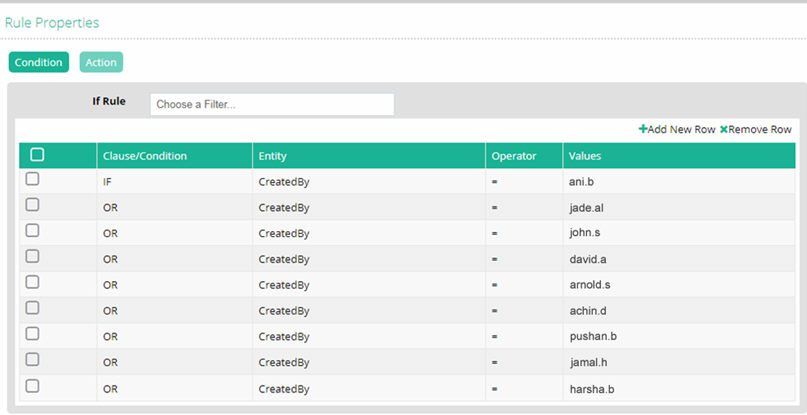
Condition created against created by
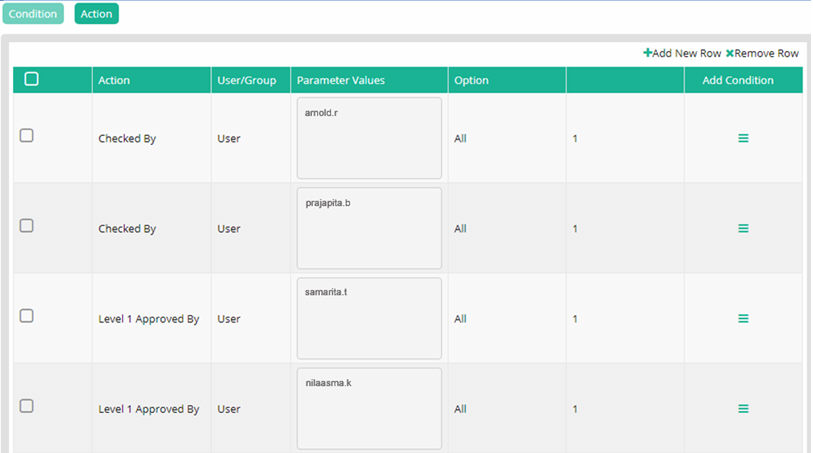
User tagged under Action:
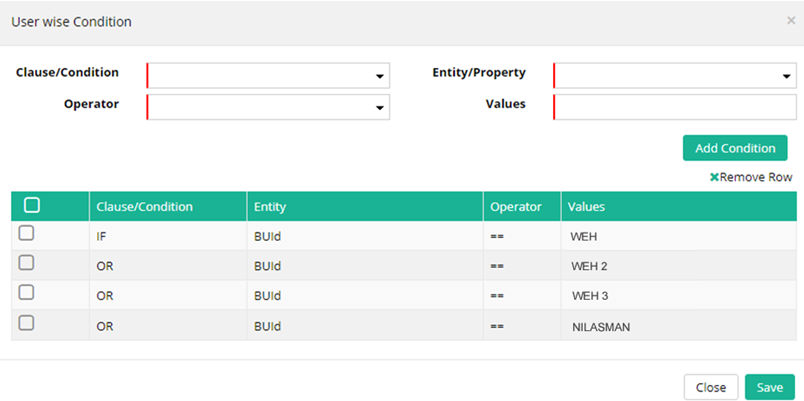
User wise condition added In Add condition (selected BU’s are excluding against the selected user.
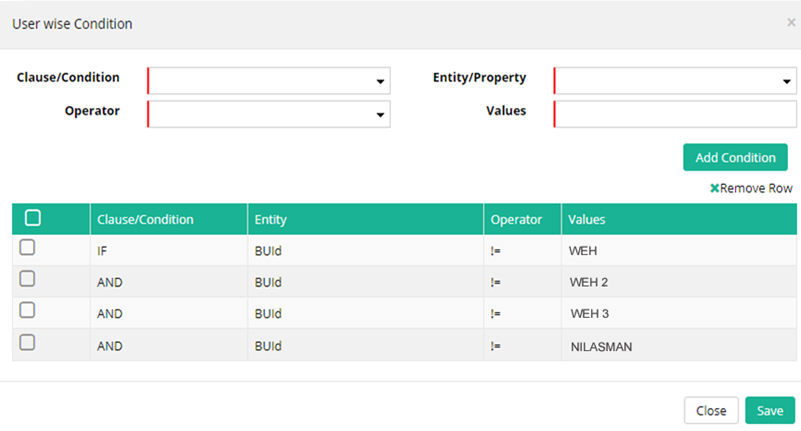
User condition (user will have approval access against these BU only)
Parallel Level Approval system
Parallel Level Approval system has been introduced in work flow management. User can define multiple Approval level(s) as Parallel Level so that any one user of those levels can approve the document as per availability without depending on the previous level full approval (within the Parallel Level group).
Approval Action
Path: Administration > Workflow > Approval Action
To define any Approval Action as Parallel or Sequential, Rule Type has to be defined as Parallel or Sequential as per requirement.
Business Rule
Path: Administration > Workflow > Business Rule
Here Approval Workflow has to be defined. If more than one Parallel Approval level to be tagged as a group so that any one user within these group can approve documents without depending upon final approval of previous level (which is also in the same group of parallel approval). But all levels individual final approval has to be completed to move the document out of the Parallel level Group.
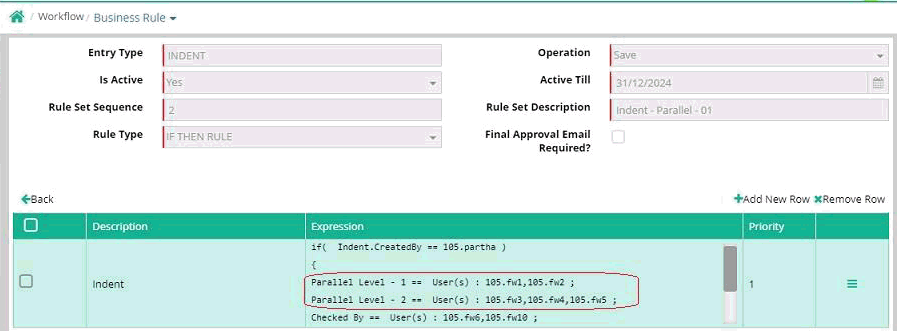
As per the previous Screen shot, Parallel Level - 1 and Parallel Level - 2 are defined one after another so that they can be treated as a Group. Here any one user of Parallel Level - 2 can approve the document before approval done by any user of Parallel Level - 1. But document has to be approved fully for Parallel Level - 1 and Parallel Level - 2 both as per the Rule defined to move the document to Checked By level which is a Sequential Approval Level out of the previous Approval Level Group.
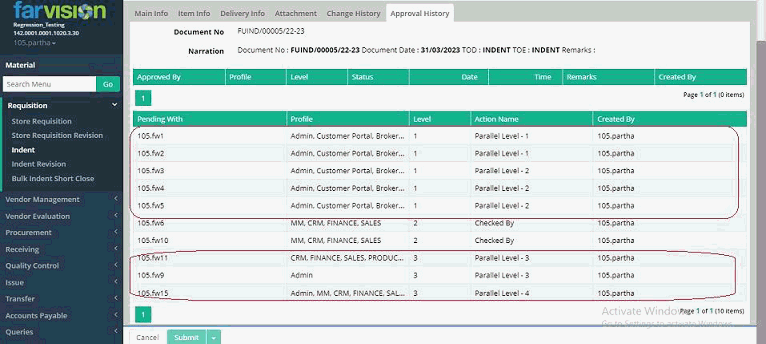
As per the above screen shot, Level 1 is a Parallel Level Approval Group consists of two parallel levels (Action name as Parallel Level – 1 and Parallel Level – 2) and then one Sequential approval level (Level 2 with Action Name Checked By) and again Level 3 is another parallel level Approval Group consists of two parallel levels (Action name as Parallel Level - 3 and Parallel Level - 4).
User of Parallel Level – 2 can approve this document before any one of Parallel Level - 1 approve the document. But approval for both approval action Parallel Level - 1 and Parallel Level - 2 has to be completed to move the document to user(s) of action name Checked By (Level - 2 ).
© Gamut Infosystems Limited