![]() Tutorial: Creating Employee Master
Tutorial: Creating Employee Master
Employee Master
All the employee related information are to be recorded in the employee master interface, including ‘Personal Information’, ‘Joining Info’, ‘Other Details’, ‘Extra Information’, ‘PF Details’, ‘ESI Details’ and ‘Passport Details’.
Main Info
Personal Information:
All personal information about the employee including company, code, user id, name, guardian’s name, marital status, gender, date of birth etc. will be recorded in this section.
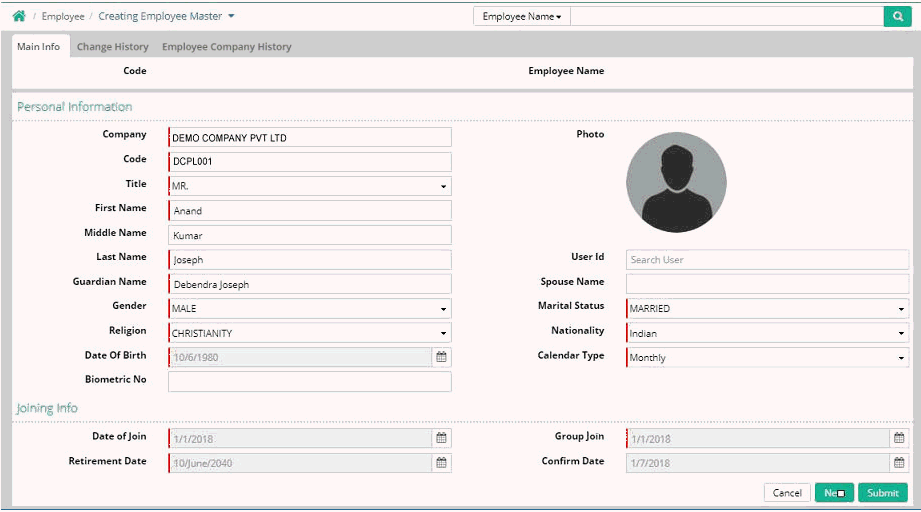
Company: Select the company where the employee belongs to. The available list will show all the companies within the Enterprise. This is a mandatory field
Code: Enter code of the employee. This code can be manually specified or auto generated. Employee code should be unique within the Enterprise. This is a mandatory field
Title: Select the title of the employee. The titles are available for selection from predefined list. This is a mandatory field
Photo: Browse and select the photograph of employee. The employee photo should be a jpg file. This is not a mandatory field
First Name: Enter first name of employee. This is a mandatory field
Middle Name: Enter middle name of employee. This is not a mandatory field
Last Name: Enter last name of employee. This is a mandatory field
User ID: If the employee is already having a login Id as a Farvision user then specify that login ID. This is not a mandatory field
Guardian Name: Enter guardian name of the employee. This is a mandatory field
Spouse Name: Enter spouse name of the employee. This is not a mandatory field
Gender: Select gender of the employee. The gender is available for selection from predefined list. This is a mandatory field
Marital Status: Select marital status of the employee. The options are available for selection from predefined list. This is a mandatory field
Religion: Select religion of the employee. The religions are available for selection from Religion master. This is a mandatory field
Nationality: Select nationality of the employee. The nationalities are available for selection from Nationality Master. This is a mandatory field
Date of Birth: Enter date of birth of the employee. This is a mandatory field
Calendar Type: Select salary generation calendar type of the employee. The calendar type is available for selection from predefined list. This is a mandatory field
Joining Info:
All joining related information including date of joining, date of group join, retirement date and confirmation date will be specified in this section.
Date of Join: Enter date of join of the employee in the above specified company. The difference between 'Date of Birth' and 'Date of Join' of an employee should be as per Minimum Age specified in Configuration > Preference Setup
If the age is set as 18 years then on the date of joining of the employee his/her age should be 18 or more years. If the period between date of birth and date of joining is less than 18 years then the Employee master record will not save. This is a mandatory field.
Example
Employee Mr. X joined an Enterprise known as Pioneer Corporation and was allocated to one of its companies ABC Co. P. Ltd. His date of joining was 15th August 2008. At this time his Joining Date and Group Join date was updated as 15/08/2008.
He worked in this company for three years. Later on he was shifted to PQR Ltd. on 16/08/2011 for the same enterprise. At that time his Joining Date was specified as 16/08/2011 but his Group Join date remains same as 15/08/2008.
Group Join: The Date of Join will automatically copied to group join. This date can be modified if required. Group Join date is the join date in Enterprise. In case of reallocation of employee from one company to another within the enterprise then also the Group join date remains same. This is a mandatory field.
Retirement Date: The date of retirement will be auto calculated by the system based on specified date of birth and the Retirement Age mentioned in Configuration > Preference Setup
Example
If the date of birth of an employee is 22/01/1998 and the Retirement Age mentioned in preference setup is 60 years then the date of retirement will be 21/01/2048.
Confirm Date: The date of confirmation will be auto calculated by the system based on specified date of joining and the Confirmation Period mentioned in Configuration > Preference Setup
Example
If the date of joining of an employee is 15/08/2008 and the Confirmation Period mentioned in preference setup is 6 months then the date of confirmation will be 15/02/2009.
Address Information:
Address details of the employee will be recorded in this section.
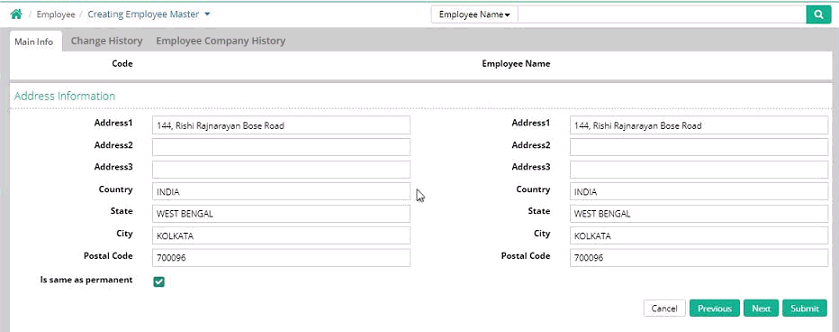
Address1: Enter first line of permanent address
Address2: Enter second line of permanent address
Address3: Enter third line of permanent address
Country: Select the name of country of Permanent address
State: Select the name of state of Permanent address
City: Select the name of city of Permanent address
Postal Code: Enter Postal Code of permanent address
Is same as permanent: If this button is clicked then the details of permanent address will be copied to current address.
Contact Information:
Contact information about the employee includes phone number, mobile number and email address.

Phone No: Enter official phone number of the employee. Click on the + button to specify personal phone number of the employee
Mobile: Enter official mobile number of the employee. Click on the + button to specify personal mobile number of the employee
Email: Enter official email address of the employee. Click on the + button to specify personal email address of the employee
Other Details:
Other details of employee includes previous code, blood group, working experience, anniversary date etc.
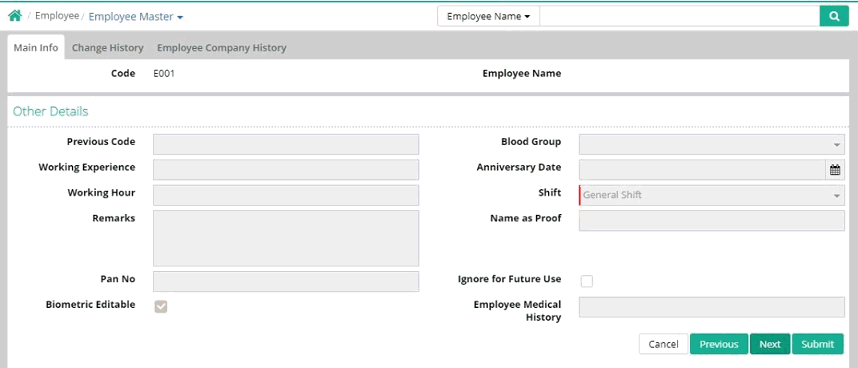
Previous Code: Previous Employee code if any can be specified here. Previous code means Employee code in previous company of the Enterprise
Blood Group: Blood group of the employee can be selected here. The default values of blood group are available for selection
Working Experience: Working experience of the employee can be entered in years
Anniversary Date: Anniversary Date of the employee
Working Hour: Default working hour of the employee can be specified here
Shift: Shift code of the employee is to be selected. Daily In Out time of the employee is determined from shift master as per specified shift code
Remarks: Any remarks related to employee can be specified here
Name as Proof: Exact name is to be entered as specified in Photo Identity or document
Pan No: Employee Pan number can be entered here
Ignore for Future Use: Click to deactivate the employee for future processing
Biometric Editable: This option is to be selected to enable manual attendance in FV Pay App
Employee Medical History: medical history of employee can be entered here
Extra Information:
Extra information about the employee includes number of children, identity number, birth place, accommodation, caste, birth time, handicap information etc.

No of children: Enter number of children of the employee. This is referred internally for calculation of IT deduction on Child Education.
Accommodation: Select the type of residence of the employee. Options of accommodation is displayed from accommodation master
Identity No: Enter employee number as specified in Identity Card
Caste: Cast of the employee can be selected from the options available from General/BC/OBC/Sc/ST/Others
Birth Place: Enter place of birth of the employee
Birth Time: Enter time of birth of the employee
Is Handicapped: It is to be selected if the employee is handicapped
Handicap: Select nature of Handicap if 'Is Handicapped' option is checked. Options of Handicap is displayed from Handicap master
Consider Previous Income: If this option is checked and income details of previous company for the same financial year is specified in savings declaration screen then this income will be considered in Yearly Tax computation
Bank Information:
Bank information of the employee includes payment mode, payment source and account number. NEFT and personal bank details can also be updated.
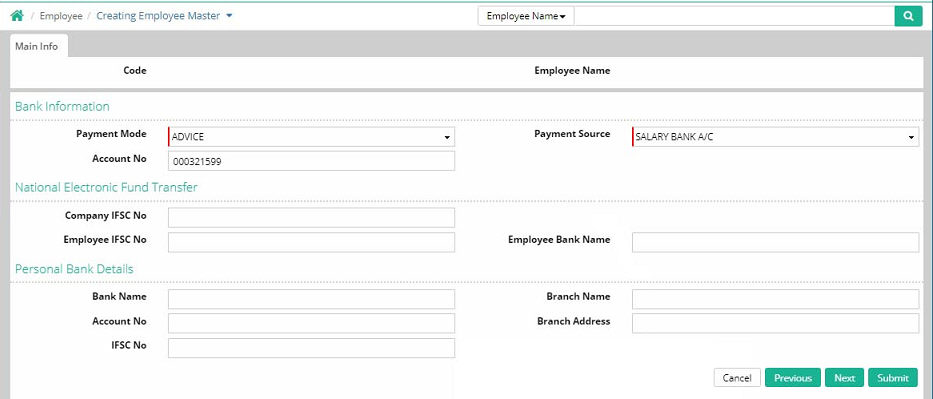
Bank Information
Payment Mode: Select mode of payment of salary
Payment Source: Select the bank name of the company from where salary is to be disbursed
Account No: Enter salary account number of the employee
National Electronic Fund Transfer
Company IFSC No: Enter IFSC Number of bank branch of the company
Employee IFSC No: Enter IFSC Number of bank branch of the employee
Employee Bank Name: Enter bank name of the employee
Personal Bank Details
Bank Name: Enter personal bank name of the employee
Branch Name: Enter bank branch name of the employee
Account No: Enter account number of the employee
Branch Address: Enter bank branch address of the employee
IFSC No: Enter IFSC Number of the bank branch of the employee
PF Details
Employee provident fund details are to be recorded here.
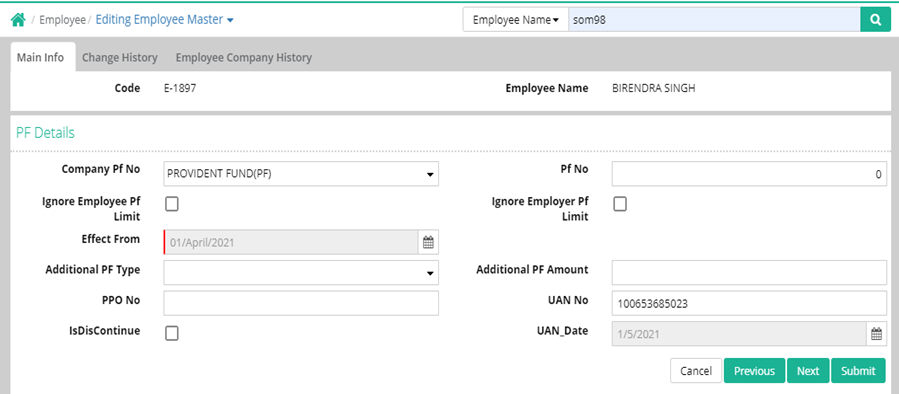
Company PF No: Select company provident fund registration number under which the employee is registered
PF No: Enter employee provident fund number as assigned by the company
Ignore Employee PF Limit: This box is to be checked if Employee Statutory PF limit for the employee is not applicable
Ignore Employer PF Limit: This box is to be checked if Employer Statutory PF limit for the employee is not applicable
Effect From: This is the effective date of the provident fund account
Additional PF Type: If Voluntary PF is applicable for the employee then type of payment needs to be specified from available options from Percentage/Amount
Additional PF Amount: If Voluntary PF is payable in amount then the payment amount needs to be specified. If Voluntary PF is payable in Percentage then the rate of payment needs to be specified
PPO No: Enter Pension Payment Order number of the employee
UAN No: Universal Account number of the employee is a unique number provided to all employee under PF. This number remains constant even if the employee changes his/her company
UAN Date: FPF calculation will be done considering this date i.e. an employee’s FPF calculation will be 0 or there will be an amount depending on the UAN date. For example, if an employee joins any company then FPF amount gets calculated as per Govt. rules considering group joining date but now instead of group joining date user can calculate the same from the UAN date.
ESI Details
Employee state insurance related information are to be recorded here

Company ESI No: Enter company ESI registration Number under which the employee is registered
ESI No: Enter employee ESI number as assigned by the company
Effect From: This is the effective date of the ESI account
Effect To: This is the effective date upto which the ESI account is valid
Doctor Name: Enter name of the ESI Doctor
Doctor Area: Enter area covered by ESI Doctor
EPehchan Card: It is the Permanent Identity Card for availing medical benefits till the eligibility for medical benefit exists.
Is Discontinue: This option is selected if at any point of time the ESI number is to be discontinued
Note: User can remove company ESI No from Employee Master
Passport Details
Employee passport details are to be recorded here

Passport No: Enter the passport number of the employee
Issue Place: Enter the place of Issuance of passport
Issue Date: Enter date of issue of passport
Expiry Date: Enter expiry date of Passport
Leave Opening
Opening leave balance of the employee for the leave year are to be recorded here
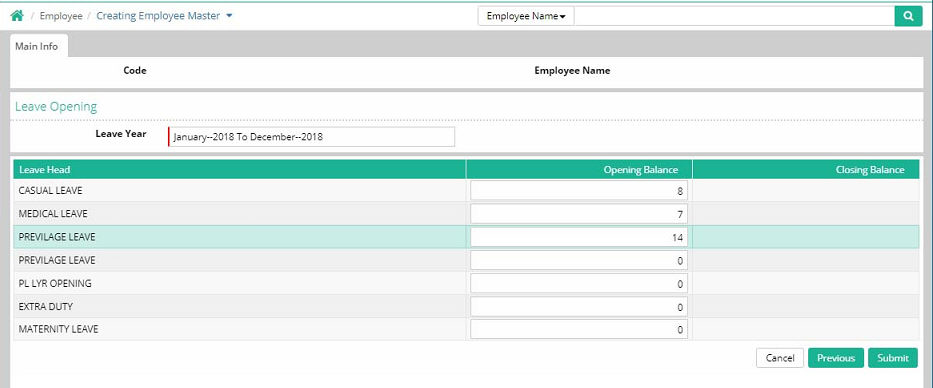
Leave Year: Select Leave Year for which opening balance needs to be specified
All Leave Heads are automatically displayed and head wise opening balance as applicable at the time of joining of employee needs to be specified.
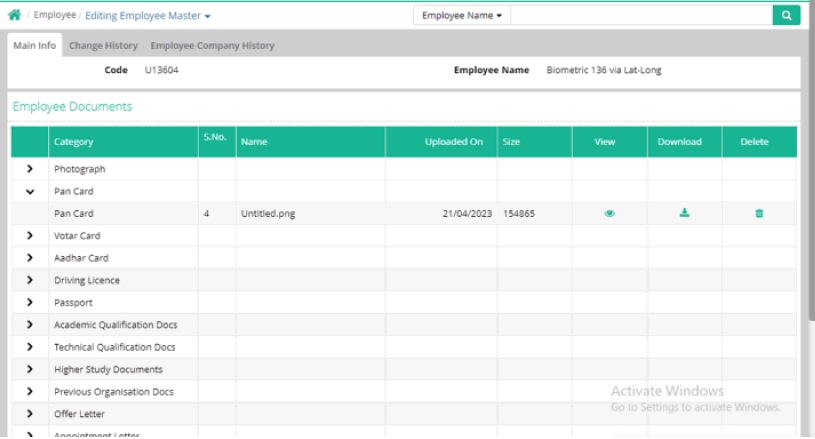
Employee Documents
Employee documents uploaded through Employee Portal > My Portal > Employee Profile are visible in Employee Master.
![]() Tutorial: Creating Employee Master
Tutorial: Creating Employee Master
© Gamut Infosystems Limited