![]() Tutorial: Creating Receipt/Payment
Tutorial: Creating Receipt/Payment
Receipt/Payment is required for Cash/Bank entry within same unit of a Company.
![]()
Business Unit: User has to select the Business Unit where the receipt/payment entry will be done, which comes from Business unit organizer (Administration > Company > Business unit organizer)
Financial Year: Select financial year
Document Type: User can create document types as per choice and convenience through Administration > Company > Document Type
Process of creating document type
![]()
In order to create document type, user needs to select the pre-defined category from ‘Category’ drop-down menu.
For example, a document type “Marigold Business Units” is required to be as ‘Inter Unit Receipt/Payment’.
‘Inter Unit (RP)’ is required to be selected as category and “Marigold Business Units” is entered as description.
The pre-defined categories with their explanations:
1) Receipt/Payment – This is used to make cash/bank entry within same unit of a Company
2) Inter Unit (RP) – This is used to make cash/bank entry within two or more units of a Company
3) Inter Company (RP) - This is used to make cash/bank entry within two or more Companies
4) Inter Unit Fund Transfer (RP) - This is used to make fund transfer entry within two or more units of a Company
5) Inter Company Fund Transfer (RP) - This is used to make fund transfer entry within two or more Companies
6) Opening Unclear Cheque – This is used to record the uncleared cheques of an organization and this is required only once at the time of installation of ERP.
User can create own document type as per choice and convenience under the specific category as discussed above.
However some document types are already available in the system which resembles the category names as shown below.
![]()
Document Date: Specify the document date.
Document Number: It will be auto generated after saving the entry
Cash/Bank: Select Cash Account or Bank Account as per requirement. This Cash Account/Bank Account comes from Finance > Setup > Account Head master.
Narration: Enter a short description about the receipt/payment entry.
Click '+ Add New Row', the following section will open.
A. Main Info
Click this link to make a new receipt/payment entry.
![]()
Dr./Cr.: On the basis requirement, select any of the options including debit and credit.
Account Head: Select the account head.
Parent Account Head: Search and select the parent account head. If Account Head is of Sub-Ledger type, then Parent Account Head has to be selected. In selection drop down, those Parent Account Heads will be displayed which is directly related to the selected Account Head along with all other Account Heads which are marked as same as to that base Parent Account.
Amount: Enter the amount.
Click 'Next'. The 'Other Info' section will open.
B. Other Info
Other info section is used to furnish payment related information.
![]()
Payment Mode: Payment can happen through Cheque, Demand Draft, Pay Order, Cash, Net Banking, Credit Card, RTGS, NEFT, ECheque and Direct.
1. Payment Mode - Cheque:
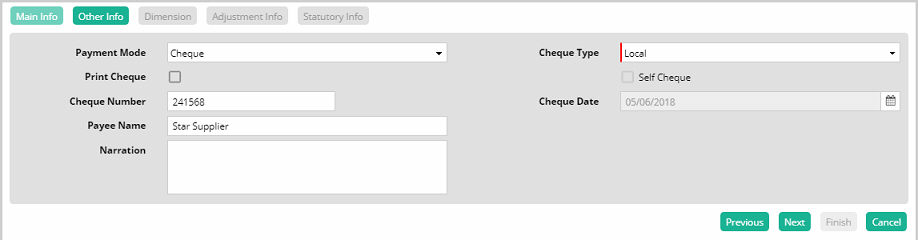
Cheque Type: Select cheque type as local or outstation
Print Cheque: To Print the Cheque through system, this option will be selected. If this is selected then 'Cheque Number' and 'Cheque Date' will be disabled (which will be updated after the successful cheque printing).
![]()
Cheque Number: If 'Print Cheque' is not selected then cheque number is required to be entered manually
Cheque Date: If 'Print Cheque' is not selected then cheque date is required to be entered manually
Payee Name: Select the payee name (which will be printed on Cheque)
Narration: Put detail purpose of this entry
2. Payment Mode - Demand Draft:
![]()
Only one additional field ‘Payable At’ is added. Other fields are same as those in ‘Cheque’ payment mode option.
Cheque Type: Select cheque type as local or outstation
Print Cheque: To Print the Cheque through system, this option will be selected. If this is selected then 'Cheque Number' and 'Cheque Date' will be disabled (which will be updated after the successful cheque printing).
Cheque Number: If 'Print Cheque' is not selected then cheque number is required to be entered manually
Cheque Date: If 'Print Cheque' is not selected then cheque date is required to be entered manually
Payee Name: Select or enter the payee name
Payable At: Enter the place of payment
Narration: Put detail purpose of this entry
3. Payment Mode - Pay Order:
![]()
Cheque Type: Select cheque type as local or outstation
Print Cheque: To Print the Cheque through system, this option will be selected. If this is selected then 'Cheque Number' and 'Cheque Date' will be disabled (which will be updated after the successful cheque printing).
Cheque Number: If 'Print Cheque' is not selected then cheque number is required to be entered manually
Cheque Date: If 'Print Cheque' is not selected then cheque date is required to be entered manually
Payee Name: Select the payee name (which will be printed on Cheque)
Narration: Put detail purpose of this entry
4. Payment Mode - Cash:
![]()
Payee Name: Select or enter payee name
Narration: Put detail purpose of this entry
5. Payment Mode - Net Banking:
![]()
Payee Name: Select or enter payee name
Ref Number: Enter payment reference number
Ref Date: Enter payment reference date
Narration: Put detail purpose of this entry
6. Payment Mode - Credit Card:
![]()
Payee Name: Select or enter payee name
Card Type: Select card type (Visa / Master etc.)
Card Type selection is mandatory in case of payment through credit card.
Narration: Put detail purpose of this entry
7. Payment Mode - RTGS:
![]()
Cheque Type: Select cheque type as local or outstation
Print Cheque: Cheque print option is required to print the cheque through system which will be sent to Drawee Bank as an instruction of Payment
Payee Name: Select or enter the payee name
Ref Number: Enter RTGS Reference number
Ref Date: Enter RTGS Reference date
Narration: Put detail purpose of this entry
8. Payment Mode - NEFT:
![]()
Cheque Type: Select cheque type as local or outstation
Print Cheque: NEFT Cheque can be printed for sending to the bank through selecting this option
Payee Name: Select or enter the payee name
Ref Number: Enter NEFT Reference number
Ref Date: Enter NEFT Reference date
Narration: Put detail purpose of this entry
9. Payment Mode - E Cheque:
![]()
Cheque Type: Select cheque type as local or outstation
Print Cheque: E Cheque can be printed at stationary branch as per the discretion of bank
Cheque Number: If 'Print Cheque' is not checked then cheque number is required to be entered manually
Cheque Date: If 'Print Cheque' is not checked then cheque date is required to be entered manually
Payee Name: Select or enter payee name
Print Location: Select print location. It implies the branch of the bank where E Cheque will be printed
Narration: Put detail purpose of this entry
User is also able to print cheque
10. Payment Mode - Direct:
![]()
Cheque Type: Select cheque type as local or outstation
Print Cheque: Cheque for direct payment can be printed as it is required to submit to some of the banks
Cheque Number: If 'Print Cheque' is not checked then cheque number is required to be entered manually
Cheque Date: If 'Print Cheque' is not checked then cheque date is required to be entered manually
Payee Name: Select or enter payee name
Narration: Put detail purpose of this entry
C. Dimension
For construction related payment dimension
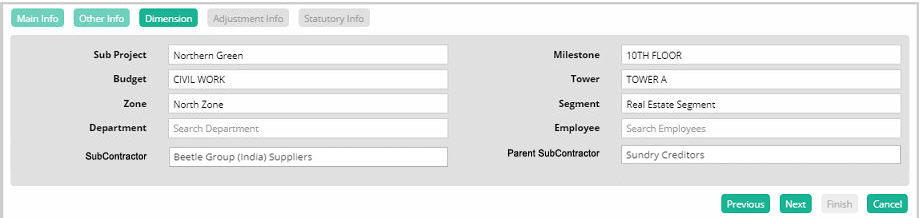
Sub Project: Select the name of the Sub Project (Sub Projects come from Engineering > Activity Management)
Budget: Select budget name (Budget comes from Engineering > Budgeting)
Zone: Select zone of the sub project (Zones come from Administration > Setup)
Milestone: Type the milestone for the payment
Tower: Type the name of the tower
Segment: Select the segment (Segments come from Administration > Setup)
SubContractor: Select the Sub Contractor (Sub Contractor come from Finance > Setup > Account Head Master)
Parent SubContractor: Select Parent Sub Contractor
For employee related payment dimension
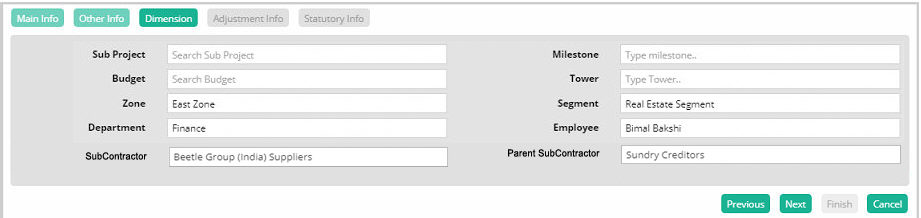
Zone: Select zone of the sub project (Zones come from Administration > Setup)
Segment: Select the segment (Segments come from Administration > Setup)
Department: Select the department (Departments come from Payroll Master)
Employee: Select the name of the employee (Name of the employees come from Payroll Master)
D. Adjustment Info
Under 'Adjustment Info', Bill Wise or On A/c payment can be done.
1. Bill Wise Payment
Click '+Add New Row' and select 'Bill Wise' in 'Type' drop down.
![]()
As soon as the document number is chosen, the details of the document with Date, Invoice Date, Bill Amount, Balance Amount and Adjustment Amount will be populated.
![]()
Click 'Save'.
![]()
2. On A/c Payment
Click '+Add New Row' and select 'On A/c' in 'Type' drop down.
![]()
Enter 'Adjustment Amount' and click 'Save'.
![]()
![]()
E. Statutory Info
Under 'Statutory Info' the TDS deduction details are displayed with deduction type, description, assessable amount, rate and amount.
![]()
Click 'Finish'. The Receipt/Payment entry gets completed. Now save the entry.
![]()
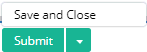
Click ‘Submit’ to stay in the form and make another entry.
Click ‘Save & Close’ to save the entry and exit from the interface.
Notes:
Change History is shown in Receipt Payment Imported Entries

![]() Tutorial: Creating Receipt/Payment
Tutorial: Creating Receipt/Payment
© Gamut Infosystems Limited